Wednesday 28 November 2012

Yarnstorms & Stars...

It's nearly December which means.... it's also nearly Christmas - yaaay!  I love all the preparations and can't wait to get the tree, decorations & lights out this weekend!


crochet stars


In the meantime, this week I am making, making, making for the PsAZZ yarnstorm  -  it's only 1 week to go - and today I am working up a batch of crochet stars for the garlands in as many bright colours as I can find in my stash.  I think I will need to starch them slightly somehow too (if you have any good tips on this please leave me a comment!).


I have been gradually making bits & pieces over the last couple of months and yesterday I had a sort out of what I have collected so far.  Hopefully there will be another load waiting at the BIRD office too.  So, here's a few pics of things...


granny squares
Some granny squares for the 'patchwork' door cover....


Random, higgly-piggly knitted bits...


We are amassing quite a few pom poms....


Various post garters & patches..

and there's more....

my lovely Mum's knitted some squares....

and one of my kind Aunt's has made some pretty bunting...
 
and fab Christmas Trees!

...one group member gave me some brightly coloured 'whirly-gigs' (I don't know what their real name would be...)


and we have some plastic 'hands' (because they are part of the PsAZZ Logo)....


....and these next gorgeous pieces of crochet came all the way from a yarnstormer in Australia (I am so chuffed at that!)


Next week, on the 5th December, it will all be taken to Bath for the 'big stitch up' and hopefully several volunteers will be helping to sew everything together and get it all strung up. These fab Christmas Stockings made by one of my cousins are SO cute I was tempted to keep them but I'd feel too guilty so I'm  thinking they will look just great inside across one of the windows..


If you want to join in and make something there is still time  - simply check out this post for details... and I will take lots & lots of photo's to post on the blog when it's all done! 

I really must be a little excited by it all because keep finding myself humming 'jingle bells.......'


Happy Making!

:-)


Thursday 22 November 2012

The Tatting Trials...(Part I)

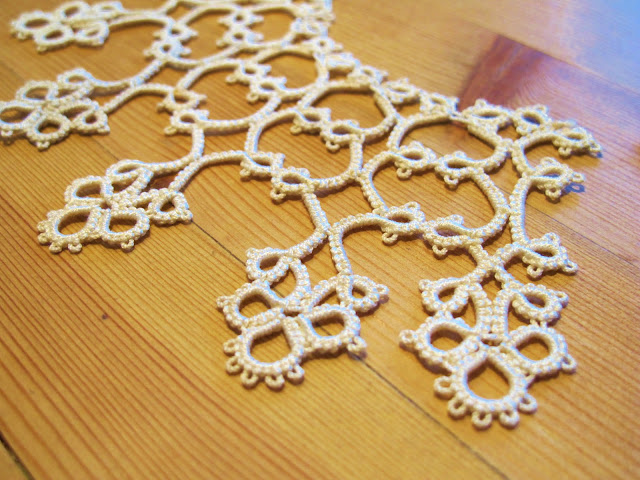
Recently my Mum gave me a little flat box (the kind that cotton handkerchiefs used to be gift boxed in) which had inside several layers of my Nan's beautiful 'tatting' handiwork.  I just have to show you some of it!  

Tatting was often used as an edging for household linens
My nan was a great crafter and always had a project or two on the go. One of my best memories are of my dolls being kitted out with new dresses, cloaks, hats and the like.   Many a technique for this & that was shown to me as a child - some of which I learnt and still use to this day and some of which didn't quite sink in.... like tatting. 


       I'm not sure what these little pieces were to become but, with Christmas coming, they remind me of snowflakes!


 I clearly remember my Nan trying to teach me with some fine thread and a shuttle but for some reason I just couldn't get to grips with it and I think it was one of the rare times we both got a little frustrated!  I guess you could say it is almost the-craft-that-got-away but I do not give up easily so it has become more of a challenge.... a sort of quest to 'learn & conquer' that I return to every now and then.  Having looked through my Nan's work again, I'm not sure I will ever be able to create intricate pieces like this beautiful collar though...


tatted collar
This must have taken hours and hours and hours of work!

tatting collar
I had to zoom in on the edging of the collar to try and show you the neat, teeny-tiny 'picot' loops - and they are in a scalloped, double row formation!
Tatting is primarily a form of lace making that became more popular during the 19th Century.  You basically make a series of knots & loops, with or without a 'shuttle', and it was frequently used to create pretty edgings for cloths, collars & cuffs or used on it's own to make things like pretty doillies. I've been told that an Aunt of mine taught my Nan how to 'tat' when she was laid up in hospital with not much else to do.  Well, all I can say is she was taught well and must have had a lot of time to practise because her work was exquisite as you can see in these pictures!

This collar is amazingly delicate! I wonder what it was for....

tatting picots
(close up view)
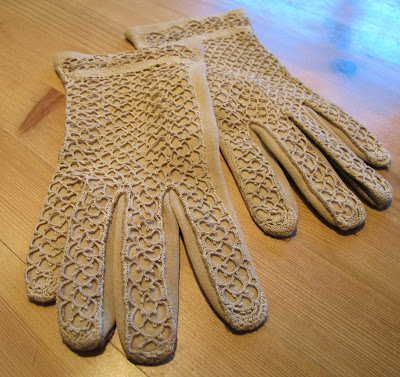
These gloves belonged to my Mum, lovingly embellished by her Mum with some fine lacy tatting in a colour that blends so well with the gloves you'd think they were made like it! Mum says she used to wear them all the time and even though they fit me now and it's tempting, I won't be wearing them for fear of wear & tear.  I am thinking they might look good in some sort of frame which would help keep them from deteriorating and they could then become an heirloom for my daughter.

tatting embellished gloves


                                                      (Close up of gloves detail)

I have to say I almost don't want to show you any of my tatting now because I really am not up to standard but then, we all start somewhere and after I finally got to grips with the basic shuttle technique (hooray!) I made some teeny-tiny picot loops like this...

At least the picots are all of a similar size...


...and because when I'm learning something new I can get slightly impatient to just see something finished....I made a pair of simple tat earrings like this

tatted earrings
Not bad for a learner?

Have you tried tatting - I'd love to hear about it?   It is something I am determined to improve on so bear with me and I'll let you know how it goes... 

xx


Tuesday 20 November 2012

Pomegranates & cheesecake...

This is definately not one for anyone one a diet but I did warn you I could feel a pudding post coming on! 


pomegranate cheescake


This time it's the naughtiest, creamiest, yummiest cheesecake...it's always popular with the family and I decided to make one last week when I had some friends to visit.  It went very quickly too  - which is just as well because it stopped me from eating too many slices!

I've got to the stage where it's a bit of a 'throw-it-together-and-adjust-according-to-taste' type recipe so apologies for no exact measurements but I am sure you will get the gist (or be able to find yourself a similar 'no cook' recipe!).


To begin I simply bash up some digestive biscuits until they are nice and crumbly then melt a good dollop of butter in a saucepan before adding & mixing them in (don't you just love the word 'dollop'). If I accidentally add too much butter I just add more crushed biscuits, after all no-one usually complains that the biscuit base is too thick!  Next, press the biscuit mixture into the bottom of a loose-base tin and I find it helps to smooth it with the back of a metal spoon.

For the filling,  I normally mix up around 1 + 1/3 tubs of cream cheese, couple of tablespoons of honey and a couple of ounces of brown sugar.

Then I whip some double cream (around a medium size pot) and spoon some into the cream cheese/honey/sugar mixture and carefully mix it in.  The best part now is to keep having little tastes until it has a nice balance of creamy-cheesy-yumminess!

After that, all that remains is to just dollop (there's that word again) it on top of the biscuit base, smooth nicely and pop in the fridge for several hours  or overnight is better.

So, that is the basic no-cook cheesecake and all that's left to do is decide what topping to decorate it with. I chose to embellish it with some gorgeous little scarlet pomegranate seeds...


Pomegranates can be quite tricky to de-seed and the juice really stains so be careful where/what you are preparing it on.  The method I used was to slice the top off then score & pull apart rather than cut in half.  You can also bash the outside with a spoon to make the seeds pop out.  It's a little messy but they are worth it for a stunning finish to the cheesecake!  

Once it's chilled nicely, remove the cheese cake from the fridge and put it on a plate then sprinkle with the little red jewels. Then for the best bit.....  simply slice & serve with an extra sprinkling of juicy little seeds ....mmmm


pomegranate cheesecake

I did tell you it was a bit naughty...


Enjoy! 

xxx


Wednesday 14 November 2012

Autumn leaves, fruits & textile charms....

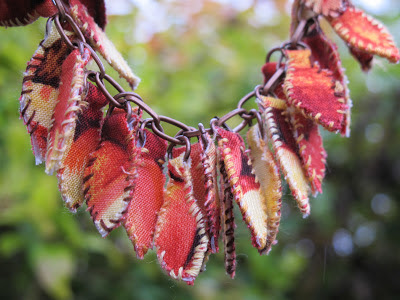
fabric leaf charms
Can you guess what has inspired this make?


It's a bit grey out today but last weekend it was sunny & bright which made the beautiful range of autumnal colours of the leaves really 'pop' against the blue sky! I couldn't resist going out & about to take a few snaps and, after all the crocheting last week, I felt like I needed a bit of fresh air and maybe a change of craft medium before I get stuck back into making stuff for the yarnstorm (only 3 weeks to go until the stitch up!)


How beautiful the deep russet browns and coppers...

                           
and striking the bright yellows & golds...

                           
Such luscious shades of pinks from blush to scarlet reds   
- all adding up to a truly stunning colour palette!   


Some of the trees even seemed alight with colour!


It was all simply magnificent!

So, inspired by the colour overload and on the search for something a bit different I started to have an idea for making some textile charms that I could use in some sort of jewellery design.  When we got in I rummaged through my fabric stash for something with the kinds of colours that I wanted to work with and sat down to figure out just how I would go about making my fabric into 'charms'....

I tested several ideas before settling on the final technique and I think they worked out quite well in the end.  They do have the colour mix I was aiming for and I like the rustic handmade look.  They also hang quite well without 'curling' which is what you need  when you want to use something like this in jewellery.

If you would like to have a go I have put all the steps together in an ADM mini-make for you (click here)

 
how to make fabric charms


Of course, you could add a few beaded charms as extra embellishments to your charm bracelet or use the basic technique as a guide for making other shaped textile charms.  They would also look quite good on a lariat style necklace... the choices for variation are many!

I think I am going to put this one in my box of Christmas gift makes and I know just the person who would like this sort of thing so that's one thing ticked off my gift list!


Oh - and here's some autumn fruits too.....

autumn fruit

....I can feel a pudding post coming on :-)


Enjoy making xx 


UPDATE: now also available as a flip book style tutorial
- simply click to see it:


Monday 12 November 2012

Poppies update...

Just a quick update...

I spent much of last week making crochet poppies and giving them away to people who then went on to make their own donations in the poppy tins.  I've worked out that it has helped raise more than £100 for the Poppy Appeal which is totally fab  - thanks to everyone who made a donation!


crochet poppies


Next year I must start making them earlier....

Back soon xx

UPDATE: now also available as a flip book style tutorial
- simply click to play the video below:

Tuesday 6 November 2012

How to crochet a Poppy...

crochet poppy
 
Yesterday it was moustaches, today it is Poppies!  It would seem like November is a month of causes so let's all get stuck in..

I made this poppy flower pattern after I couldn't find one I liked and I've made a few in lovely bright scarlet red cotton DK for friends & family on the premise that they will put a bit extra in the poppy appeal collecting tins - hopefully you will do the same if you use this pattern...


The Poppy
crochet poppy

       Red Cotton DK & 3.5mm Crochet Hook
  • Start with a magic circle and make 2 ch (you can use 3ch if you are not familiar with magic circles - just crochet into the 1st ch instead)
  • Make 11 dc into the circle, ss to join
  • *2ch, 2tr into first dc then 2tr in each of next 3 dc but on the last one add 2ch and ss to the same dc* - this completes the first 'petal'
  •  ss to next dc then rep from * to * to make another 2 'petals'
  • Fasten off and pull the thread from the magic circle to close the gap. 
  • Sew in the ends before trimming neatly.
  • Sew a small black button on to the middle of the poppy and add a brooch finding or safety pin to the back.

There is a picture step-by-step here for those who prefer a visual guide :-)


1)  Start with a magic circle and make 2 ch then make 11 dc into the circle

2)  ss to join, 2ch

3)  2tr into same dc
 
4) 2tr in each of next 3 dc

5) add 2ch and ss to the same dc - this completes the first petal

6) ss to next dc, 2ch 


how to crochet a poppy tutorial
7) 2tr into same dc

8) 2tr in each of next 3 dc

9) add 2ch and ss to the same dc (to complete the 2nd petal) then ss to next dc, 2ch


10)  2tr into same dc, 2tr in each of next 3dc, add 2ch and ss to same dc to complete the 3rd petal.

11)  Pull the thread from the magic circle to close the gap, sew in the ends & trim.  Add a black button to the middle of the poppy & a safety pin or brooch finding to the back.


The Leaf
crochet leaf

Green DK & 3.0mm crochet hook
  •  Start with 10 chain
  • 1tr, 2dtr in 3rd ch from hook
  • 1tr in next 3ch
  • 1htr in next 2 ch
  • 1dc in next ch
  • ss to next ch, 1ch
  • then, working down the other side of the chain...ss to first ch
  • 1dc in next ch
  • 1htr in next 2 ch
  • 1tr in next 3ch
  • 1tr, 2dtr in next ch
  • ss to back to first ch & fasten off

They can be worn with or without a leaf (I quite like them plain) and I think they look quite good as a cluster for a brooch too.

Enjoy x


UPDATE: now also available as a flip book style video tutorial HERE


If you use this pattern around November time, please pop an extra £ in poppy appeal donation tins - thanks!

Monday 5 November 2012

Cro a Mo (....how to crochet a moustache for Movember!)

crochet moustache

I guess many people come to supporting a specific charity through some sort of personal experience and through it end up wanting to give back - to try and make a difference no matter how small....

Several years back I did just that and began to try & help raise awareness of prostate cancer by putting some of the Prostate Cancer UK little blue man badges on my website and it was very humbling that people bought them and I was able to send them a cheque.  One of the main things I became aware of is how this is one of a few cancers that has many viable treatment options - particularly if caught early (further information here).  Unfortunately, because one of the first symptoms is a little embarrasing many men leave it too long so awareness really is the key and I fully support the 'Movember' initiative that I am pleased to say is growing in support every year!

Last year my husband grew a 'Mo' and managed to raise a good amount £££s.  If I could 'grow a Mo' I really would....but I can't so I have decided to 'cro a Mo' instead - and I figured I would share it with you and that that will still be helping to raise awareness :-)

So ladies,  hooks at the ready please...


(1)   Beginning with a little DK wool and a 3.0mm crochet hook, cast on 5 ch.
(2)   1dc in the second ch from the hook
(3)   1dc in each of the 3 remaining chain stitches, 1ch, turn


(4)  dc2tog, dc2tog, 1ch, turn
(5)  *1dc in each dc, 1 ch, turn, repeat from * once more
(6)   2dctog, 1ch, turn


(7) *1dc, 1ch, turn then repeat from * another 3 times
(8)   2ch then fasten off
(9)   Repeat steps 1-8 to make a second half of the moustache then sew them together!
grow a mo

........ta-dah!

Now you can thread it on a stick and wear with pride..

 I am so going to regret this photo aren't I ...but then, it's all for a good cause :-)

And you can make lots in lots of colours and help get the word out and if you would like to you can make a donation to  Movember here:  http://uk.movember.com/donate/

Thank you xxxxx


And the winner is......

.....no-one!

As of this morning there were no comments left on the blog for the bead giveaway so I will put it away for  another time.

Back soon!